

Key takeaways
- 30–80 lumens: subtle pathway or decorative lighting, best for low-traffic areas.
- 80–150 lumens: useful step lighting for most decks.
- 150–300 lumens: appropriate for broad landings or unusually dark locations, but use shielding to avoid glare.
The best LED deck lights for safer outdoor steps are low-voltage, warm-white fixtures with 70–150 lumens per step, an outdoor-rated housing, and spacing that lights each tread without creating glare.
For most residential decks, choose 2700K–3000K light, an IP65 or better rating, and a 12-volt wired system rather than small solar lights. Wired fixtures cost more to install, but they provide steadier brightness, work under covered decks, and do not depend on winter daylight or a well-positioned solar panel.
Our top picks
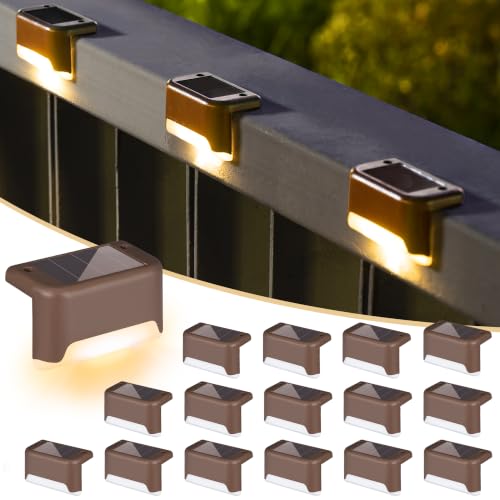


As an Amazon Associate we earn from qualifying purchases at no extra cost to you. Ratings are shown as listed on Amazon.
Best LED deck lights by situation
| Deck or stair situation | Best light type | Useful target specification | Why it fits |
|---|---|---|---|
| Frequently used stairs | Low-voltage recessed or surface-mounted step lights | 100–150 lumens, 2700K–3000K, IP65+ | Consistent illumination and good visibility on every tread |
| Occasional-use steps on a modest budget | Solar step lights with replaceable or high-capacity batteries | 30–80 lumens, 3000K, IP44–IP65 | No trenching or cable run, provided the panel receives direct sun |
| Deck railings and posts | LED post-cap or under-rail lights | 50–120 lumens per fixture, 2700K–3000K | Adds edge definition and spreads light across walking areas |
| Large deck or long stair run | 12-volt LED system with transformer and plug-in connectors | 12V, 3–5W per fixture, IP65–IP67 | Easier to expand and more reliable than many independent solar lights |
| Minimal visual impact | Recessed step lights or slim linear fixtures | 60–120 lumens, shielded lens, 25–50 mm depth where possible | Reduces protrusions and keeps the fixture below the walking path |
Brightness: enough to see, not enough to glare
Lumens describe total light output, but fixture placement and lens design matter just as much. A narrow beam pointed directly at approaching eyes can feel harsher than a brighter fixture with a frosted, downward-facing lens.
For a typical residential stair, 70–150 lumens per step is a practical range. Use the lower end when fixtures are mounted under the tread or beside every other step. Use the higher end for wide stairs, dark surfaces, or fixtures mounted farther away. Rail-mounted lights generally need less output because they illuminate a larger area from above.
- 30–80 lumens: subtle pathway or decorative lighting, best for low-traffic areas.
- 80–150 lumens: useful step lighting for most decks.
- 150–300 lumens: appropriate for broad landings or unusually dark locations, but use shielding to avoid glare.
Avoid judging safety by wattage alone. Modern LEDs can produce substantial light from 1–5 watts, and two fixtures with the same wattage can have very different optics.
Color temperature and nighttime comfort
Choose 2700K or 3000K for deck stairs. These warm-white temperatures make wood and composite decking look natural and are generally less stark than 4000K–6500K “daylight” LEDs. A 3000K light is slightly crisper and can help distinguish tread edges, while 2700K is softer for entertaining areas.
Cooler light is not automatically safer. Excessively blue-white lighting can create sharp contrast and reflected glare on pale composite boards, painted railings, or wet surfaces. If you want a modern appearance, 3000K is usually a better compromise than 4000K.
Weather resistance: read the IP rating
Deck lighting is exposed to rain, condensation, pollen, insects, and freeze-thaw cycles. Look for a sealed fixture rated at least IP65 when it is directly exposed to weather. IP65 protects against dust and water jets; IP67 adds protection against temporary immersion and is useful for fixtures close to the ground or in areas where water can collect.
- IP44: suitable only for sheltered locations with limited direct spray.
- IP65: a sensible minimum for exposed step and railing lights.
- IP67: preferable for ground-level fixtures, recessed areas, and wet climates.
The rating applies to the complete installed assembly, not merely the LED module. Cable glands, connectors, junction boxes, and the point where a wire enters the housing often fail before the LED itself. Use weatherproof connectors and leave a small drip loop so water does not run directly into a connection.
Wired versus solar LED deck lights
12-volt wired systems
A low-voltage system uses a transformer connected to a standard outdoor receptacle, cable, connectors, and fixtures. It is the better choice for stairs used every evening, shaded decks, and homes where reliable output matters. Choose a transformer with at least 20% spare capacity. For example, ten 3-watt lights require 30 watts; a transformer rated around 36 watts or more leaves useful headroom.
Voltage drop becomes more noticeable on long cable runs. Keep runs within the manufacturer’s limits, use the recommended cable gauge, and avoid connecting too many fixtures at the far end of one thin cable. A central or “hub” layout can distribute power more evenly than one very long daisy chain.
Solar lights
Solar fixtures are convenient for a few steps where running cable would be disruptive. Their real-world runtime depends on panel exposure, battery capacity, temperature, and the selected brightness mode. A shaded deck, northern-facing stairway, or winter location may produce a much shorter runtime than the packaging’s ideal figure.
Solar lights work best on low-traffic steps and remote areas. Position each panel where it receives unobstructed sunlight, clean it several times per year, and expect the rechargeable battery to be a consumable component. Replaceable battery designs are easier to maintain than sealed units.
Spacing lights on stairs and railings
For step lights, install one fixture per tread when the stairs are used frequently or are more than about 36 inches wide. On narrower stairs, alternating fixtures can work if each tread remains visibly separated from the next. Avoid placing a bright fixture at eye level; mounting it under the nosing or on the side riser usually produces better downward illumination.
For railings, space small lights approximately 4–6 feet apart, then adjust for the fixture’s beam angle. A narrow-beam light needs closer spacing; a diffused under-rail strip can cover a longer section but may require an aluminum channel to protect it from moisture and provide heat dissipation.
As a planning example, a 12-foot stair-side railing with lights spaced every 4 feet needs about four fixtures if you place one near each end and two between them. If each fixture draws 2 watts, the total is 8 watts. A 12-volt transformer rated at 15 watts or more provides adequate capacity without running at its limit.
Installation: the safer order of operations
- Mark the walking path. Identify tread edges, railings, landings, gates, and areas where glare could face approaching people.
- Choose the mounting position. Aim light downward or across the tread, not directly toward the top or bottom of the stairs.
- Mock up spacing. Temporarily tape fixtures in place after dark. This reveals shadows and glare before drilling.
- Plan the cable route. Keep wires away from sharp deck edges, standing water, mower paths, and screw locations. Use clips or protected channels rather than loose cable.
- Install the transformer and controls. Use a weather-rated receptacle and follow local electrical requirements. A timer or dusk-to-dawn photocell avoids leaving lights on all day.
- Connect and seal every joint. Keep connectors elevated where possible, use compatible fittings, and leave service slack for future repairs.
- Test after dark. Walk up and down the stairs from both directions. Reduce brightness or add shielding if you see the LED source directly.
For hardwired mains-voltage work, new outdoor receptacles, or wiring that must pass through walls, use a qualified electrician. Low-voltage does not mean every installation is risk-free, particularly near water or existing electrical circuits.
Ownership costs and common failure points
Basic solar step lights commonly cost about $15–$50 per fixture. Better sealed solar units may cost $50–$120. Wired low-voltage fixtures are often about $25–$150 each, with a complete small system commonly landing around $200–$800 before professional labor. Recessed installation can cost more when the deck structure must be opened.
The LED emitter itself can last for many years, but seals, connectors, plastic lenses, solar batteries, and flexible strip-light coatings tend to age first. Clean lenses and solar panels with a soft cloth rather than an abrasive pad. Inspect connectors each spring, tighten loose mounting hardware, and replace cracked housings instead of sealing over damage with temporary tape.
Common mistakes include using indoor-rated LED tape outdoors, mixing incompatible connectors, oversizing brightness on narrow stairs, placing solar panels under rail shadows, and installing fixtures so close to the tread edge that snow removal or foot traffic hits them. A slightly dimmer, shielded fixture in the correct position is usually more useful than a brighter fixture aimed poorly.
Bottom line
For the best balance of safety, reliability, and appearance, choose warm-white 12-volt LED step lights rated IP65 or IP67, target roughly 80–150 lumens per tread, and space fixtures so every tread edge is readable without exposing the light source to eye level. Choose solar only when occasional use and simple installation outweigh dependable all-season brightness.



Write Your Review
No reviews yet. Be the first to share your experience!